This is a quick and easy (and inexpensive!) craft for Primary activity girls or young women. It is a great way to reinforce a lesson or new goal. For instance, you could talk with the girls about their current ideas and goals, then have them choose a goal and make a ring as a reminder to work on it consistently.
Lots of beautiful ways to use this idea!
Some ideas and directions are below…

A few ideas for young women:
- Make a ring for a new scripture you’ll all memorize, and tell the girls the ring reminds them to work on the scripture. (Maybe we could help the young women by putting more memorized scriptures in their lives.)
- Have the girls make a ring to remind them of one of their current goals. If someone is trying to remember to study their scriptures every day, they could make a “Study” ring or “Scriptures” ring (or both!).
- Make rings to go with the year’s YW theme. For the a theme of “Stand in Holy Places,” you could do rings with: “Stand”, “Ye in”, “Holy Places”, “Be Not”, and “Moved”. Or, you could do just do “Stand in Holy Places” and then “Be Not Moved”, if you want an easier project. I think the girls would love spelling out the theme with their rings. They’d probably also love mixing them up and being silly, but I’m betting most of the time they’d keep them in order.
- You could also do themes your ward is focusing on, like “Five Things” (if your ward has made five goals for the year–it’ll make the girls try to remember what they are) or “Don’t Be a Sneetch”. (One year, we focused on unity and not excluding people like the Sneetches did in Dr. Seuss’ story about them.)
Directions
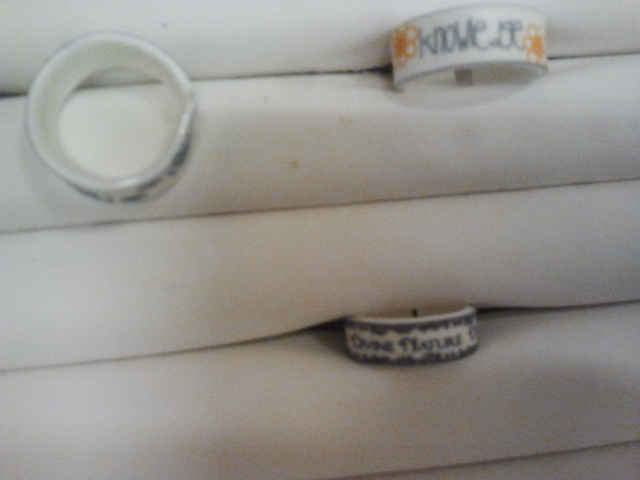
1. Cut the paper in the width and length you want. I like the 1/2″ width. Measure your finger to get the right length of paper to cut.
*If you want a thicker paper look, just cut longer strips of paper and roll the paper so you have several thicknesses and a fatter ring.
2. Roll the paper around your finger and mark the beginning and end of where the text will show. Decorate your paper with text, images, flourishes.
3. Roll your ring around your finger again, with a little wiggle room, since the Mod Podge will make the ring tighter.
*If you want to tape the ring together so it’s easier to apply Mod Podge, have at it. It won’t show.
4. Apply Mod Podge to both the inside and outside in layers, taking care to not make the ring too small for you by adding too much!
Let it dry and you’re done!
ChurchofJesusChristYoungWomen.com