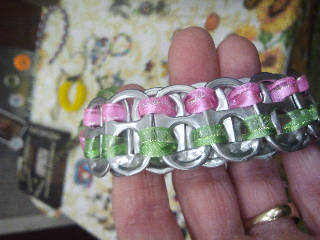
Just weave the ribbons through the pop tops in the pattern, or use your own pattern. So cute! More detailed instructions are below.
Ideas
1. This could be used as a Personal Progress value craft if you choose the ribbon according to the value you’re working on.
2. I love the idea of doing this as a family history craft, where before you start the craft you talk about linking families together. You could have them bring their four generation chart already filled out, to make sure that work gets done–or you could ask them to fill it out by the next week and they’ll get their bracelet to take home that day. 🙂
3. As I mentioned at the beginning, this would be a great way to introduce a theme of unity among the young women. Maybe you could start with a quick message about how when we stick together, we make a more beautiful whole (then show the bracelet). You could play some unifying games, read a book like Dr. Seuss’ Sneetches, eat treats, etc. You could make it a lot of fun and drive home the message.
While I’m on that unity theme idea, I have to mention that at girls camp one year we tried to help unify the girls and get them out of their comfort zone. One thing we did was that at each meal, we placed table toppers with “get to know you” questions. They were told they could choose who to sit by, but it had to be a different person at each meal. While they were eating, they would ask each other the questions and strike up conversations. It was a very successful way to get the girls to talk and feel more comfortable, since we gave them topics to bring up. If you want the files we used to print out those table toppers, let me know.
Back to the linked bracelets…. 🙂
Directions
1. Make sure all pop tops are sanded down so there are no sharp edges.
2. Measure both ribbons to be a few inches longer than your wrist.
Note: If you look closely at the photo above, you’ll see there is a front layer of pop tops and a back layer. Notice the front layer is rightside-up (the fat opening is at the bottom) and it only stays together because of the threading through the back layer. Notice that the back layer pop tops are upside-down (the fat opening is on top).
4. Thread first ribbon down through first pop top opening.
5. Now you’re going to thread two pop tops for the beginning of the back layer. Go down through one back pop top, then up through second pop top.
6. Bring ribbon up through a new top layer pop top. (I hope this is making sense!)
7. Continue until you’ve filled your ribbons, then tie them together. I personally think some dangling ribbon is cute for the tie-off, but if you don’t like the dangling ribbon, just tie super tight and cut the excess.
So cute! Let me know if you have questions.
I do have pop tops and ribbon kits for $1.50 per kit (each kit makes 1 bracelet). Drop me a line if you’re interested.
Thanks to the Provo/Orem camp training for this idea.